Snip, snip…and you’re done!
How to capture Screen Shots Using Windows 7 and Vista’s Snipping Tool
Use the Snipping Tool to capture a screen shot or snip a portion of any document or image on your screen. The Snipping tool in Vista offers a highlighter if you want to highlight part of the item you have snipped. Feeling very professorial? Use the red pen to circle certain portions of the document you have just snipped! Then save the image and use it or email it to colleagues who will be secretly impressed by your technical savvy!
1. Click the Start button. Then go to: All Programs→Accessories→Snipping Tool.
2. Click the on the drop down arrow next to the New button.
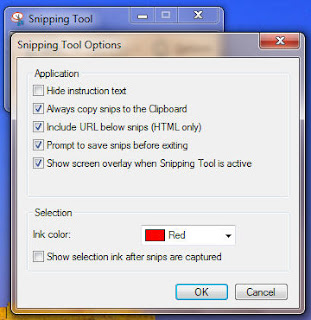 4. Once you capture an image you will get a box that provides certain options: you can annotate portions of the snip with the Pen, or use a Highlighter to emphasize a point. You can email the file by clicking on the envelope icon. It automatically opens the Outlook program so unless you have an e-mail account configured in Outlook, do not use the email option. The save icon is your standard floppy disk image.
Clicking on it will give you access to the Save As dialog box. Once you have saved the file you can always use your own email program and send the file as an attachment. To cancel a snip or start anew, just click on Cancel or New and snip away!

Use the Snipping Tool to capture a screen shot or snip a portion of any document or image on your screen. The Snipping tool in Vista offers a highlighter if you want to highlight part of the item you have snipped. Feeling very professorial? Use the red pen to circle certain portions of the document you have just snipped! Then save the image and use it or email it to colleagues who will be secretly impressed by your technical savvy!
1. Click the Start button. Then go to: All Programs→Accessories→Snipping Tool.
2. Click the on the drop down arrow next to the New button.
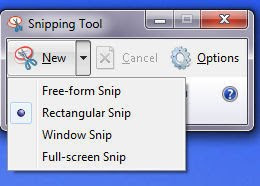
You can choose any of the four different snip modes from the drop-down list:3. Depending on the snip mode you have chosen, you can click and drag or simply click on the window with one click.
Free-Form Snip: lets you draw any kind of line you like to outline the object you want to snip, but you have to have a very steady hand or your snip will not look very neat.
Rectangular Snip: click and drag over any area to form a rectangular snip.
Window Snip allows you to select an active window to snip.
Full Screen Snip: automatically captures the entire screen.
 4. Once you capture an image you will get a box that provides certain options: you can annotate portions of the snip with the Pen, or use a Highlighter to emphasize a point. You can email the file by clicking on the envelope icon. It automatically opens the Outlook program so unless you have an e-mail account configured in Outlook, do not use the email option. The save icon is your standard floppy disk image.
Clicking on it will give you access to the Save As dialog box. Once you have saved the file you can always use your own email program and send the file as an attachment. To cancel a snip or start anew, just click on Cancel or New and snip away!
- Rina B.
Comments
Post a Comment