Get in Shape with AutoShape!
Feeling creative? Then add text or images to AutoShapes in Word, Excel, PowerPoint or Publisher 2007 and liven up your ho-hum document. You can enclose your text or pictures in AutoShapes instead of using the dreary text box.
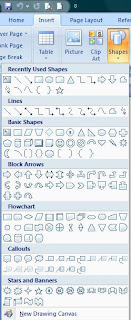
First find the AutoShape that is suitable for the text or the picture you want to include in the AutoShape. You insert an AutoShape just as you would insert a Text Box.
From the Insert tab, click on Shapes and then click on the desired shape. Hold the left Mouse button down, then drag and draw the shape on your document.
 Add text in your AutoShape:
Make sure you are clicked on your AutoShape. From the Drawing Tools tab that will appear, click on Format. From the Insert Shapes group, click the icon for Edit Text.
You will see the insertion point appear in your AutoShape and you can begin typing and the text in your AutoShape.
You can also right-click inside your AutoShape and select “Add Text” from the menu.
You can format the text in your AutoShape by selecting it and then using the Font tools in the Home tab.
 Insert a picture in your AutoShape:
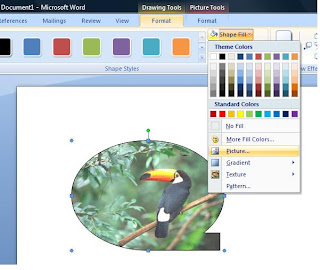
Make sure you are clicked on your AutoShape. From the Drawing Tools tab that will appear, click on Format. From the Shape Styles group, click on Shape Fill. The Shape Fill option in the Shape Styles group is a little paint bucket. Click the arrow next to it to open a menu; then choose Picture and a Select Picture dialog box will appear. Find the picture you want. Click on the desired image and then click the Insert button. The picture will be inserted in your Auto Shape. You can resize the picture by clicking and dragging the handles on the picture.
First find the AutoShape that is suitable for the text or the picture you want to include in the AutoShape. You insert an AutoShape just as you would insert a Text Box.
From the Insert tab, click on Shapes and then click on the desired shape. Hold the left Mouse button down, then drag and draw the shape on your document.
 Add text in your AutoShape:
Make sure you are clicked on your AutoShape. From the Drawing Tools tab that will appear, click on Format. From the Insert Shapes group, click the icon for Edit Text.
You will see the insertion point appear in your AutoShape and you can begin typing and the text in your AutoShape.
You can also right-click inside your AutoShape and select “Add Text” from the menu.
You can format the text in your AutoShape by selecting it and then using the Font tools in the Home tab.
 Insert a picture in your AutoShape:
Make sure you are clicked on your AutoShape. From the Drawing Tools tab that will appear, click on Format. From the Shape Styles group, click on Shape Fill. The Shape Fill option in the Shape Styles group is a little paint bucket. Click the arrow next to it to open a menu; then choose Picture and a Select Picture dialog box will appear. Find the picture you want. Click on the desired image and then click the Insert button. The picture will be inserted in your Auto Shape. You can resize the picture by clicking and dragging the handles on the picture.

Let yourself go with AutoShape!
Rina B.
Comments
Post a Comment