Need a little TOC?
Learn to create a Table of Contents (TOC) in Word 2007. A table of contents is a very useful tool, especially if you have to navigate through a long Word document. Creating a table of contents for your document is fun and easy!
Once you have finished typing your document, select the existing headings or the text that you want to use for the TOC. By holding the Ctrl key you can go through your entire document and select all the headings and then apply a heading style that you want to use in your table of contents.
Apply a heading style: From the Home tab, choose Heading 1 or Heading 2 from the Styles gallery. Of course, you can always create your own heading style.
Once you have applied a heading style click at the very beginning of the document where you want the table of contents to be inserted. (The text that you had selected is unselected now and is formatted to display the heading style of your choice).
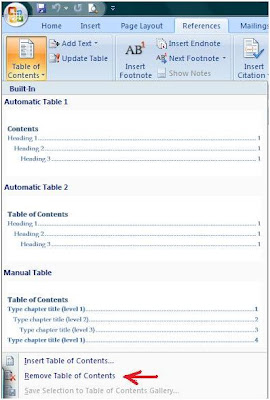
On the References tab, in the Table of Contents group, click Table of Contents, and then click the table of contents style that you want. And voila! You have a table of contents for your document. Now if you want to go to a specific part/page of your document, just hold down the Ctrl key and click the corresponding page number in your TOC and ta-da, you’re there!
Update your TOC: As you add more data you have to update your existing table of contents which is just as quick and easy. Make sure to select the text you want to include in your existing table of contents and choose the heading style you prefer. On the References tab, in the Table of Contents group, click Update Table. You can choose to either Update page numbers only or Update entire table.
 Delete a TOC: On the References tab, in the Table of Contents group, click Table of Contents. Click Remove Table of Contents. You can also delete by selecting your table of contents and using the delete key on your keyboard.
Once you have finished typing your document, select the existing headings or the text that you want to use for the TOC. By holding the Ctrl key you can go through your entire document and select all the headings and then apply a heading style that you want to use in your table of contents.
Apply a heading style: From the Home tab, choose Heading 1 or Heading 2 from the Styles gallery. Of course, you can always create your own heading style.
Once you have applied a heading style click at the very beginning of the document where you want the table of contents to be inserted. (The text that you had selected is unselected now and is formatted to display the heading style of your choice).
On the References tab, in the Table of Contents group, click Table of Contents, and then click the table of contents style that you want. And voila! You have a table of contents for your document. Now if you want to go to a specific part/page of your document, just hold down the Ctrl key and click the corresponding page number in your TOC and ta-da, you’re there!
Update your TOC: As you add more data you have to update your existing table of contents which is just as quick and easy. Make sure to select the text you want to include in your existing table of contents and choose the heading style you prefer. On the References tab, in the Table of Contents group, click Update Table. You can choose to either Update page numbers only or Update entire table.
 Delete a TOC: On the References tab, in the Table of Contents group, click Table of Contents. Click Remove Table of Contents. You can also delete by selecting your table of contents and using the delete key on your keyboard.
- Rina B.
Comments
Post a Comment