Just in Time for Thanksgiving!
No, not another turkey recipe but something that will certainly impress and please great Grandma and last longer than a stuffed turkey! Create your family tree chart using SmartArt graphics in PowerPoint just in time for the family get together.
 From the Home tab, click on Slide Layout and choose the Title and Content layout for your family tree chart. Then from the Insert tab, click the icon for SmartArt.
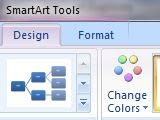
From the category list on the left, click on Hierarchy. From the center menu, choose the first hierarchy option – Organization Chart. Click OK and the SmartArt Organization Chart will be inserted in your slide. Click on your chart and the contextual tab with all the SmartArt tools will become available for you to work with.
Now just click in the text boxes and fill in all the names of your family members. Depending on the amount of text you type in any given text box, the font size will automatically adjust in order for all the text to fit in the respective text box.


You can add new members to the family tree chart after you add a new shape to the existing chart. To add a new shape, click on an existing shape and then from the SmartArt tools tab, in the Design tab, click on Add Shape and choose the option you want. You can continue to add new shapes as necessary to complete your family tree. You can also use the Add Assistant command from the Add Shape menu to indicate relationships. To delete a text box, click on the border of the text box and use the delete key on your keyboard. You can add more slides as needed to show various other branches of your family. Finally, spice up your family tree chart by inserting family photographs. You can also add some pizzazz to your chart by adding an image to create an interesting background.
 From the Home tab, click on Slide Layout and choose the Title and Content layout for your family tree chart. Then from the Insert tab, click the icon for SmartArt.
From the category list on the left, click on Hierarchy. From the center menu, choose the first hierarchy option – Organization Chart. Click OK and the SmartArt Organization Chart will be inserted in your slide. Click on your chart and the contextual tab with all the SmartArt tools will become available for you to work with.
Now just click in the text boxes and fill in all the names of your family members. Depending on the amount of text you type in any given text box, the font size will automatically adjust in order for all the text to fit in the respective text box.


You can add new members to the family tree chart after you add a new shape to the existing chart. To add a new shape, click on an existing shape and then from the SmartArt tools tab, in the Design tab, click on Add Shape and choose the option you want. You can continue to add new shapes as necessary to complete your family tree. You can also use the Add Assistant command from the Add Shape menu to indicate relationships. To delete a text box, click on the border of the text box and use the delete key on your keyboard.
 You can add more slides as needed to show various other branches of your family. Finally, spice up your family tree chart by inserting family photographs. You can also add some pizzazz to your chart by adding an image to create an interesting background.
- Rina B.
Comments
Post a Comment