Manage your Outlook!
Is your mailbox cluttered and disorganized making it hard for you to find the message you need? Outlook offers several different ways for you to organize your mailbox: you can create folders and group similar messages in specific folders, Assign a Category, or use the Flag for follow Up feature. You can also set up your Outlook to sort your messages by date, sender or file size enabling you to find the message you need quickly. Or, you can change the way Outlook displays your messages so as to make it easier to identify the required message.
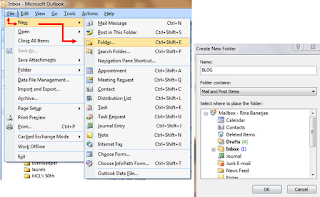
Create Folders for Similar Messages: you can easily create a folder for your book club and perhaps another one for your blog. Now when you get a message about your book club, or your blog, move it to the appropriate folder so when you need to see a message that is related to your book club, or your blog, you know where to look! It is easy to create a new folder – open Outlook, click on File, point to New and then click on Folder. In the Create new Folder dialog box, type a name for your new folder and then click OK.
Flag for Follow Up: do you have an important message that you cannot respond to right away? Or, say you want to keep track of an important message. Well, you can flag these important messages so you don’t accidentally delete them! With your Outlook open, look at the right of each subject line of the message. You will see grey flags. Click on the flag and it will change color and become bright red. Now when you open your Outlook, you can spot these red flags right away and know which messages need your attention. Once you have flagged your message, the red flag will stay until you have dealt with the message and choose to un-flag it. Just click on the red flag, once you have attended to the flagged message, and the flag will change to a check mark indicating that you have taken care of that particular message. Right-click the flag and you will get a drop-down list of options to choose from, including setting a reminder for the message.

To-Do Bar: your flagged messages will also appear on the To-Do Bar. From View, click on To-Do Bar, and then click on Normal. The To-Do Bar will now be displayed on the bottom right of your screen. From here you can use the calendar to schedule appointments/reminders or create a list of tasks. To ensure that you can see the calendar, upcoming appointments, or a list of scheduled tasks access the To-Do Bar first, and then from View, scroll over To-Do Bar to access the drop-down menu. Then select Date Navigator, Appointments and Task List. Once you have made the To-Do Bar visible it will stay visible even when you switch between Mail, Calendar, Contacts, or Tasks. In order to hide the To-Do Bar, click on View then To-Do Bar, then from the drop-down menu, select Off or simply click on the x to close the To-Do Bar.

Arrange By: you can set the criteria you want Outlook to use to sort your messages. From the View command, click on Arrange By and then choose the appropriate criteria. You can sort by Date, Size, Sender, Subject, etc. As soon as you choose the sorting method you want, your messages are automatically restructured. But here’s a shortcut: if your Outlook is set up to display the Reading Pane on the right side, you will see on the top of the list of messages two buttons: Arranged By: Date on the left side and on the right side, Newest on top. By clicking on Arranged By you can access the shortcut menu and rearrange the way Outlook is displaying your messages. Say you are looking for a message with an attachment, clicking on Attachments from the drop-down menu displays only those messages that have an attachment first, thus helping you find the required message quickly. Clicking on Newest on Top instantly changes the button to Oldest on Top, also changing the order of your displayed messages, enabling you to see your old messages first.

Assign a Category: you can assign a color category to related messages so you can quickly identify the messages you want. To assign a color category to your message, open Outlook with your Current View set to Messages. Look at the right of your subject line and just before the flag icon you will see a square icon. Clicking on the square will fill it with a color and your message will display a band of the same color on top. You can also assign a name to these color categories: find the Categories icon - it’s a small multi-colored cube - on top of your Inbox after the Forward command. Click on it and from the drop-down menu, click on All Categories to open the dialog box where you can rename a category. Now you can easily identify and track related messages. If you change the name of a category that you have already assigned to a bunch of messages, the category name will change on all the related messages.


Change your View: there are several different views in your Outlook and you can change the view so that Outlook will sort and display your messages in a certain order thus making it easier for you to find a particular message quickly. To see your current view, from the Menu bar, click on View and then choose Current View. The view that is selected will have a check mark in front of it. Hunting for a message that you received within the last week? Then just select Last Seven Days and the display will change to show you just the last seven days of messages.

In my next blog, I will explore the calendar feature in Microsoft Outlook ... so keep reading!
Create Folders for Similar Messages: you can easily create a folder for your book club and perhaps another one for your blog. Now when you get a message about your book club, or your blog, move it to the appropriate folder so when you need to see a message that is related to your book club, or your blog, you know where to look! It is easy to create a new folder – open Outlook, click on File, point to New and then click on Folder. In the Create new Folder dialog box, type a name for your new folder and then click OK.

Flag for Follow Up: do you have an important message that you cannot respond to right away? Or, say you want to keep track of an important message. Well, you can flag these important messages so you don’t accidentally delete them! With your Outlook open, look at the right of each subject line of the message. You will see grey flags. Click on the flag and it will change color and become bright red. Now when you open your Outlook, you can spot these red flags right away and know which messages need your attention. Once you have flagged your message, the red flag will stay until you have dealt with the message and choose to un-flag it. Just click on the red flag, once you have attended to the flagged message, and the flag will change to a check mark indicating that you have taken care of that particular message. Right-click the flag and you will get a drop-down list of options to choose from, including setting a reminder for the message.

To-Do Bar: your flagged messages will also appear on the To-Do Bar. From View, click on To-Do Bar, and then click on Normal. The To-Do Bar will now be displayed on the bottom right of your screen. From here you can use the calendar to schedule appointments/reminders or create a list of tasks. To ensure that you can see the calendar, upcoming appointments, or a list of scheduled tasks access the To-Do Bar first, and then from View, scroll over To-Do Bar to access the drop-down menu. Then select Date Navigator, Appointments and Task List. Once you have made the To-Do Bar visible it will stay visible even when you switch between Mail, Calendar, Contacts, or Tasks. In order to hide the To-Do Bar, click on View then To-Do Bar, then from the drop-down menu, select Off or simply click on the x to close the To-Do Bar.

Arrange By: you can set the criteria you want Outlook to use to sort your messages. From the View command, click on Arrange By and then choose the appropriate criteria. You can sort by Date, Size, Sender, Subject, etc. As soon as you choose the sorting method you want, your messages are automatically restructured. But here’s a shortcut: if your Outlook is set up to display the Reading Pane on the right side, you will see on the top of the list of messages two buttons: Arranged By: Date on the left side and on the right side, Newest on top. By clicking on Arranged By you can access the shortcut menu and rearrange the way Outlook is displaying your messages. Say you are looking for a message with an attachment, clicking on Attachments from the drop-down menu displays only those messages that have an attachment first, thus helping you find the required message quickly. Clicking on Newest on Top instantly changes the button to Oldest on Top, also changing the order of your displayed messages, enabling you to see your old messages first.

Assign a Category: you can assign a color category to related messages so you can quickly identify the messages you want. To assign a color category to your message, open Outlook with your Current View set to Messages. Look at the right of your subject line and just before the flag icon you will see a square icon. Clicking on the square will fill it with a color and your message will display a band of the same color on top. You can also assign a name to these color categories: find the Categories icon - it’s a small multi-colored cube - on top of your Inbox after the Forward command. Click on it and from the drop-down menu, click on All Categories to open the dialog box where you can rename a category. Now you can easily identify and track related messages. If you change the name of a category that you have already assigned to a bunch of messages, the category name will change on all the related messages.


In my next blog, I will explore the calendar feature in Microsoft Outlook ... so keep reading!
- Rina B.
Comments
Post a Comment