Get to Know your Outlook Calendar!
Forgot all about that important meeting that was scheduled months ago? Feeling rushed and perpetually running late for appointments? Too many reminder notes scattered about on your desk? Then it’s time to put your Outlook calendar to use! Microsoft Outlook offers a versatile calendar that will make you an expert in time-management in no time! You can use the calendar to schedule meetings and set up reminders: never forget a birthday, a dentist appointment, or be late for a meeting again. Use the Recurrence feature to schedule an event that occurs more than once. Assign color categories to make it easy to find an event or to indicate free/busy time.

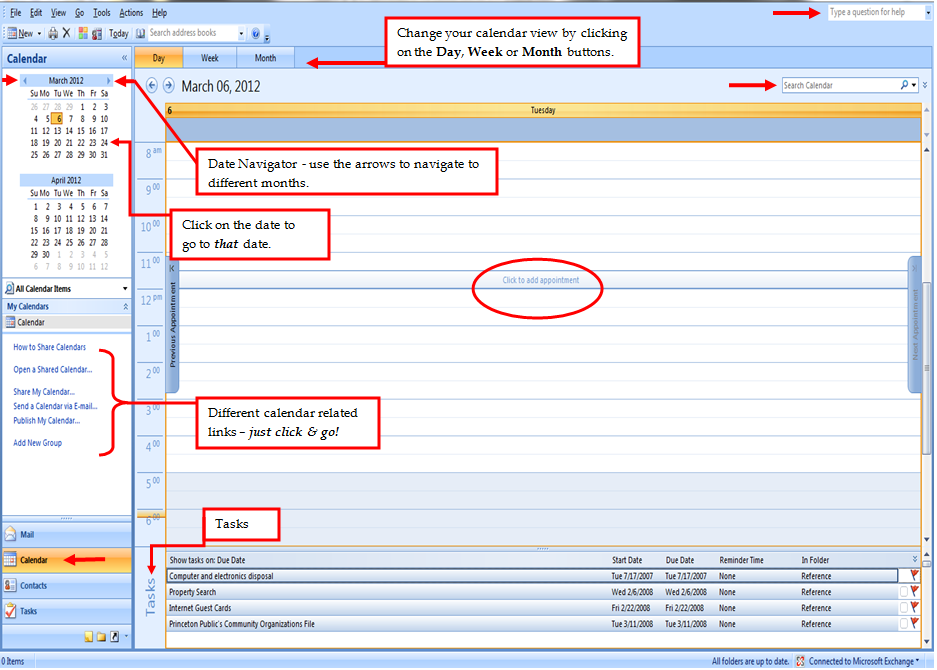
To access the calendar, click the Calendar button on the Navigation Pane. Not only will you see the calendar but on the Navigation Pane you will see other calendar-related options such as opening a shared calendar, or finding out how to add a new group. The calendar listed under My Calendars is your main/default calendar but you can create additional calendars to schedule personal activity. Say you want to create a secondary calendar for extracurricular activities, just click on New and then click Calendar. In the Create New Folder dialog box, type a name for your calendar and then click OK. Any new calendar you create will appear under My Calendars in the Navigation Pane. To delete a calendar simply right-click the calendar you wish to delete and then choose the Delete command from the menu.

Different Views: once you open your calendar it will be displayed in Day view, with the lines between the hours, displaying increments of half-hour. The day shown is the selected day. By clicking on the radio button you can change the calendar view to Week or Month. In the Week view, Outlook offers the choice of displaying the full week or just the work week. In the Month view, you can see the entire month that you have selected.
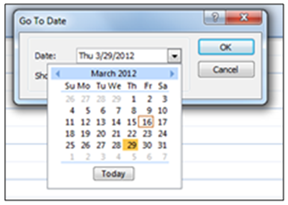
Find the Date: click on the date you want on the Date Navigator – the thumbnail image of the calendar that appears on the Navigation Pane - to go to a different date. To go to a different month than the one you are on, click on the left or the right arrow on the Date Navigator. Or click on the Go command on the Menu bar, and then click on Go to Date; in the Go to Date dialog box type the date you want and click OK. To get back to the present date you can always click on the Today command on the toolbar which will bring you back to the current day.

Scheduling: you can schedule an Appointment - your scheduled activity; an Event - may last an hour or all day but it doesn’t block out time on your calendar; a Meeting - similar to an appointment but you can send a meeting request to others via email; or a Task - much like a meeting, involves only you and once entered on your calendar, a task will show on the bottom of your calendar when in Day or Week view.
The easiest way to schedule an appointment: with the calendar open in Day view, just place your cursor over the desired time, then click and type in the details. If the appointment is longer than half hour, just drag the handle to the desired time and the time display will be extended. The appointment can also be dragged to another date on the calendar.
You can also do the following from the Actions command on the Menu bar: schedule a New Appointment, a New All Day Event, New Meeting Request, Plan a Meeting or View Group Schedules.

To edit an appointment, double-click the appointment to access the Appointment dialog box, then after making the desired revisions, click Save & Close.
Recurrence feature: it’s tedious to have to type in recurring actions, such as weekly classes or monthly meetings, over and over in your calendar. To insert a recurring event, with the calendar open, click on Actions on the Menu bar and then choose the desired activity. Or you can double-click the activity itself to access the Appointment dialog box, and then select the Recurrence icon. Choose the Recurrence pattern, and then click OK. The activity will be marked on the dates every week or month so you don’t have to enter it individually. If you want to edit the activity, or see the details of a recurring entry, just double-click the activity. A dialog box will open asking you to choose from two options: Open this occurrence or Open the series. Choose the desired option by clicking in the radio button, then clicking OK. Once the activity opens, then click the Recurrence icon and make the desired changes. After you finish revising, make sure to click Save & Close.

Reminder! When you create an activity on your Outlook calendar, a reminder is set automatically. You will see a pop-up reminder notifying you of the activity 15 minutes before the activity begins. If you want to change the reminder time then just double-click the activity to access the dialog box where you can adjust the reminder time.
Color categories: similar to assigning color categories to messages, (see Manage your Outlook), you can also assign a color category to any activity. Connecting a recurring meeting, or an event, by assigning a color category helps to organize related items thus making it easy to identify similar activities. To assign a color category to an activity: with your calendar open in Day, Week or Month view, right-click the appointment, scroll over to Categorize and then just click on the color of your choice. You can rename the color categories, delete them or add new colors by clicking on the multi-colored Categories icon, and then choosing All Categories.
Now that your Outlook is organized and under control, we can talk about email etiquette, but I’m getting ahead of myself here … just wait till next month!
To access the calendar, click the Calendar button on the Navigation Pane. Not only will you see the calendar but on the Navigation Pane you will see other calendar-related options such as opening a shared calendar, or finding out how to add a new group. The calendar listed under My Calendars is your main/default calendar but you can create additional calendars to schedule personal activity. Say you want to create a secondary calendar for extracurricular activities, just click on New and then click Calendar. In the Create New Folder dialog box, type a name for your calendar and then click OK. Any new calendar you create will appear under My Calendars in the Navigation Pane. To delete a calendar simply right-click the calendar you wish to delete and then choose the Delete command from the menu.

Different Views: once you open your calendar it will be displayed in Day view, with the lines between the hours, displaying increments of half-hour. The day shown is the selected day. By clicking on the radio button you can change the calendar view to Week or Month. In the Week view, Outlook offers the choice of displaying the full week or just the work week. In the Month view, you can see the entire month that you have selected.
Find the Date: click on the date you want on the Date Navigator – the thumbnail image of the calendar that appears on the Navigation Pane - to go to a different date. To go to a different month than the one you are on, click on the left or the right arrow on the Date Navigator. Or click on the Go command on the Menu bar, and then click on Go to Date; in the Go to Date dialog box type the date you want and click OK. To get back to the present date you can always click on the Today command on the toolbar which will bring you back to the current day.
Scheduling: you can schedule an Appointment - your scheduled activity; an Event - may last an hour or all day but it doesn’t block out time on your calendar; a Meeting - similar to an appointment but you can send a meeting request to others via email; or a Task - much like a meeting, involves only you and once entered on your calendar, a task will show on the bottom of your calendar when in Day or Week view.
The easiest way to schedule an appointment: with the calendar open in Day view, just place your cursor over the desired time, then click and type in the details. If the appointment is longer than half hour, just drag the handle to the desired time and the time display will be extended. The appointment can also be dragged to another date on the calendar.

To edit an appointment, double-click the appointment to access the Appointment dialog box, then after making the desired revisions, click Save & Close.
Recurrence feature: it’s tedious to have to type in recurring actions, such as weekly classes or monthly meetings, over and over in your calendar. To insert a recurring event, with the calendar open, click on Actions on the Menu bar and then choose the desired activity. Or you can double-click the activity itself to access the Appointment dialog box, and then select the Recurrence icon. Choose the Recurrence pattern, and then click OK. The activity will be marked on the dates every week or month so you don’t have to enter it individually. If you want to edit the activity, or see the details of a recurring entry, just double-click the activity. A dialog box will open asking you to choose from two options: Open this occurrence or Open the series. Choose the desired option by clicking in the radio button, then clicking OK. Once the activity opens, then click the Recurrence icon and make the desired changes. After you finish revising, make sure to click Save & Close.

Reminder! When you create an activity on your Outlook calendar, a reminder is set automatically. You will see a pop-up reminder notifying you of the activity 15 minutes before the activity begins. If you want to change the reminder time then just double-click the activity to access the dialog box where you can adjust the reminder time.
Color categories: similar to assigning color categories to messages, (see Manage your Outlook), you can also assign a color category to any activity. Connecting a recurring meeting, or an event, by assigning a color category helps to organize related items thus making it easy to identify similar activities. To assign a color category to an activity: with your calendar open in Day, Week or Month view, right-click the appointment, scroll over to Categorize and then just click on the color of your choice. You can rename the color categories, delete them or add new colors by clicking on the multi-colored Categories icon, and then choosing All Categories.
Now that your Outlook is organized and under control, we can talk about email etiquette, but I’m getting ahead of myself here … just wait till next month!
- Rina B.
Thanks for sharing these tips. Found them very helpful.
ReplyDelete