Create Nifty Handouts in PowerPoint!
So you have created a terrific presentation with PowerPoint that you know will impress your audience. But being realistic, you know the audience, upon walking out of the presentation, will forget almost everything you talked about! Did they even get your contact information, you wonder, in case they have questions later on? How do you ensure that the audience will retain some significant portion of the information that you just imparted? Clearly, you need to create handouts so that long after your presentation is over, the participants will have all the data they need or want! You can use PowerPoint to create a handout or use the tool in PowerPoint to create a handout in MS Word. It’s easy and quick, and you don’t have to spend hours generating handouts: PowerPoint does most of the work for you! Here’s how:
To create a handout in PowerPoint: After you have finished creating your PowerPoint presentation, click on the Office button and then click on Print. From the Print dialog box, there are various options that you can use to customize your handout before you actually print: under Print What: choose Handouts. Then under Handouts, choose the number of Handouts you want in a page.
Now, from the same dialog box, click on Preview to see the layout. If you like the outcome, then go ahead and click Print. If you chose three slides per page, then the handout generated will have three slides on the left side of the page and lines on the right to jot down notes. Looks great and it takes minimal time to create a professional-looking handout!
But if you want to include more data on your handouts and want to customize it even further, then you can transfer your handout to a Word document, in a table format with space for you to fill in more information! Not to worry, PowerPoint will still do most of the work! Here’s how:
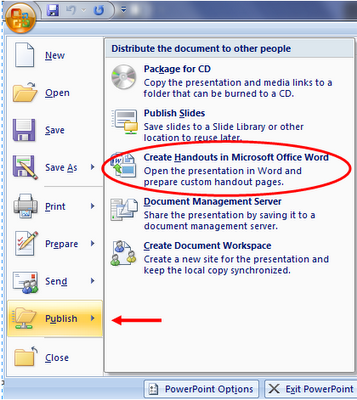
Again, after you have finished creating your presentation, click on the Office button, and then click on Publish.
Under Distribute the document to other people, select Create Handouts in Microsoft Office Word.
A pop box offering various page layout options will appear. From the dialog box, Send to Microsoft Office Word, click on the radio button next to the page layout of your choice. And, then click OK.
Viola! Your presentation will open in a Word document. All the information is now transferred to a Word document, in a table format. If you chose the first option, Notes next to slides, then the table, that opens in Word, will have three columns and as many rows as there are slides in your presentation. Now you can delete the first numbered column if you feel it’s unnecessary, widen or reduce the width of a column if you wish, and, still have space in the last column, which is blank, to type in more information. See my previous blog, Table it! Inserting a Table in Word, for tips on working with tables in Word.
So now you will have a memorable presentation in more ways than one!
-Rina B


This is great. I've made a number of PowerPoint presentations, and the issue is often: "Who's going to remember this when they leave the room?"
ReplyDeleteThank you, Rina B, for putting together this helpful guide on how to make handout versions of a PowerPoint presentation.
I will definitely use this information in the future. You've just made my life a lot easier!
Ryan,
ReplyDeleteThank you for your positive feedback. It's very rewarding to see the instruction in my blog being utilized.
Rina