PowerPoint: Make the Most of Your Animations
PowerPoint presentations can easily go awry, especially if the slide show becomes distracting and detracts from the central message of your presentation. After all, PowerPoint is supposed to support your presentation, not lead it. PowerPoint offers many great tools that allow you to emphasize points made, as well as related graphics that reinforce your message. One of these tools is animations. Animations are a set of effects that you can apply to the text and graphics, like pictures and charts, on a slide. Animations can make the information more memorable for your audience, and they allow you, the presenter, to control when and how the audience views a particular bullet point or related graphic. So, let’s say a slide contains five bullet points. Rather than having all bullet points show up at the same time, you can, through the use of animations, introduce each bullet point one-by-one. This strengthens the connection between your verbal speech and the slides you’re showing.
It turns out that animations are also the most difficult PowerPoint tool to teach since applying them and understanding how to use their related settings can take a bit of practice. So, to help you understand animations more fully and make the best use of them for your presentation, I’ve outlined five tips to keep in mind when using animations.
Before we get to that, let’s first go over a couple important terms and how they relate to animations. Animation effects are applied to objects and placeholders. Objects are elements that are inserted onto the work area. Objects include charts, pictures, tables, and text boxes. (You’ll find objects in several Office programs.) Placeholders are a type of object. They are pre-formatted containers for entering content, whether text, graphics, or video. (You know the dashed-line boxes you see on an empty slide? Those are placeholders.) So, every slide in a presentation is made up of some number of objects (including placeholders), and these are what get animated. The steps for applying animation effects to objects are easy: go to your Animations tab > Animation group, click on the animation effect you want, then, click on the object to which you want it applied. That object will then be animated. Unfortunately, applying animations isn’t always that simple, so here’s where the five tips come in.
Note: The following commands are available in PowerPoint editions 2010 – 2021. The locations of these commands are also the same among these editions. All screenshots are taken from PowerPoint 2019.
-
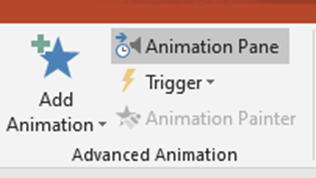
Turn on the Animation Pane.
As you apply animation effects to a slide, it can be difficult to keep track of the animation sequence, and even harder to remember what animation effects have been applied to what objects. The Animation Pane puts all of this information into one place, making it much easier to monitor, and potentially modify, your use of animations. In your Animations tab > Advanced Animation group, click on Animation Pane.
The Animation Pane will show you the objects that have been animated, the sequence of the animations, the animation effect(s) applied to each object, and other related settings. The Animation Pane makes it easy to re-order the animation sequence (just click and drag) and modify the timing and effect settings for each animation (click on the dropdown arrow to the right of the selected animation). In short, the Animation Pane gives you the full view of any/all animations in a slide and eases the process of modifying them. - Remember that you can apply additional animation effects to an object.
PowerPoint divides animation effects into four categories: Entrance, Exit, Emphasis, and Motion Paths. You can view these categories by going to the Animations tab > Animation group, then clicking on the More
Sometimes a bullet point or graphic can be better emphasized if multiple animations are used. For example, let’s say you are discussing different animals. Rather than show all of them as a group, you want to introduce each one up close so the audience can see it in more detail. However, you don’t want to layer each picture over the other as this would look sloppy. One solution: apply an Entrance animation effect, then add an Exit animation effect. This way, the first picture will exit the slide before the second one is introduced, and so on.
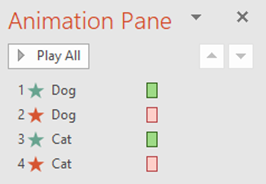
To apply additional animation effects to objects, just select the object, then select the desired additional animation effect from the Add Animation command in the Advanced Animation Remember to apply the additional animation effects in the order in which they should take place. Also remember that when applying additional animation effects to one object, they do not have to take place consecutively in the overall animation sequence. For example, let’s say you have two objects, Dog and Cat. You may want to create the following sequence: Dog (Enter), Cat (Enter), Dog (Exit), Cat (Exit). This would render the animation sequence as shown below:
If you need to modify an animation sequence, especially when additional animation effects have been applied to one object, it is easier to do this in the Animation Pane. - Decide how you want bulleted lists to be animated.
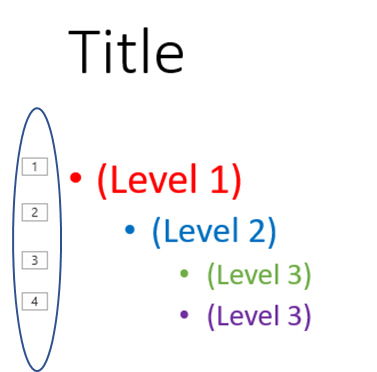
By default, PowerPoint organizes text content into multilevel lists. When you apply an animation effect to a content placeholder, the specific type of object that PowerPoint uses for text, the paragraphs are grouped together by each 1st-level paragraph and animated accordingly. For example, let’s say you have something like this:
When you apply an animation effect to this placeholder, the 2nd-level and 3rd-level paragraphs will be animated at the same time as the 1st-level paragraph (note the animation sequence). Suppose you’d rather group your text by 3rd-level paragraphs, which would have the following result:
If you want to change the way the paragraphs are grouped, you can do so by accessing the dialog box in the Animation group. First, make sure the placeholder is selected. Next, click on the dialog box launcher in the Animation group, found in the bottom-right corner. Once the dialog box opens, click on the Text Animation tab, then change the selection next to Group text. - Use Animation Painter to quickly apply identical animation settings to other objects.
As we’ve seen, animation effects are applied to objects one-by-one. We often want to apply the same animation settings to the majority of the objects in the presentation. By “settings,” I’m referring to not only the type of animation, but also other settings for that animation, like it’s duration, delay, and how it groups text (as discussed in #3 above). If you want to apply the same settings to other objects, using Animation Painter will save you a lot of time and energy.
Animation Painter is located in your Animations tab > Advanced Animation group.
First, select an object that contains the animation settings you want to match. (Hint: It is best to select a content placeholder that contains your preferred Group text setting as this will then be applied to other content placeholders in your presentation.) Next, double-click Animation Painter. Double clicking will ensure that the tool stays on until you’re done applying animation settings through your entire presentation. Then, simply click on any/all objects in your slides to which you want the same animation settings applied. Once you’re done “painting,” click on Animation Painter to turn it off. - Setting up timings manually can be difficult. Use Rehearse Timings
As you may know, you can set up your animations to occur automatically by combining Start: After Previous and Delay in the Animations tab > Timing Will you use automatic animations in a live presentation? Probably not since it’s easier and more manageable to start the next animation by clicking when you’re ready to introduce it. However, setting up timings can be useful for nailing down the exact length of your presentation, which is especially important if you’re only given a limited amount of time to complete the presentation.
Setting up timings manually is a time-consuming endeavor because animation timings will vary depending on your talking points and the amount of time spent on each one. So, instead, use Rehearse Timings to record your presentation. This tool is found in the Slide Show tab > Set Up group.
Rehearse Timings allows you to run through your slideshow while practicing your verbal speech over it. You can perfectly align your animation timings with the amount of time it takes you to discuss each point and related graphic (charts, pictures, etc.). Moreover, Rehearse Timings will also record and save your timings for both animations and slide transitions. So, once the process is complete, you will know the exact length of your presentation, and the precise duration of each individual slide. By default, the animation and slide transition timings will occur automatically during your presentation. You can turn them on or off as needed by using the Use Timings toggle, also located in the Slide Show tab > Set Up


Want more information about PowerPoint? Come to one of our computer classes! The Technology Instruction Program at the Mercer County Library System offers free computer classes every month. Click here to view our computer class calendar and register for the classes that interest you.
The library also offers many great print resources to help you master PowerPoint and other Office programs.
For Dummies series
Considered by many as the “go-to” resource for all things Microsoft Office, the For Dummies series is known for its easy-to-understand explanations, step-by-step instructions, and colorful illustrations. These PowerPoint for Dummies books are available in print at several of our branches.
PowerPoint 2019 for Dummies by Doug Lowe
PowerPoint 2016 for Dummies by Doug Lowe
PowerPoint 2013 for Dummies by Doug Lowe
Teach Yourself Visually series
Are you a visual learner? Teach Yourself Visually books use high-quality pictures and simple step-by-step instructions to walk you through different Office programs. The detailed screenshots on these glossy pages ensure that you never miss a step. These Teach Yourself Visually: PowerPoint books are available in print at several of our branches.
Teach Yourself Visually PowerPoint 2016 by Barbara Boyd and Anthony Ray
Teach Yourself Visually PowerPoint 2013 by William Wood
All-in-Ones
If you want to learn about more than one Office program, opt for an all-in-one book. These resources offer in-depth instructions on Excel, PowerPoint, Word, and more!
Microsoft Office 365 All-in-One for Dummies by Peter Weverka and Matt Wade
Microsoft Office 2019 Step by Step by Jason Lambert and Curtis Frye
Microsoft OfficeInside Out (Office 2021 and Microsoft 365) by Joe Habraken
- by Keith B., Information Technology
Comments
Post a Comment