Celebrate the Holidays with…Mail Merge?
With the holidays upon us, it may be time to start thinking about getting those cards ready. While the task of card writing may be daunting, we are often happy to do it because we know that for our loved one, friend, colleague, or whomever else, receiving a personalized, handwritten card is heartwarming and endearing. But why not ease at least some of the burden of card writing by using Mail Merge to print your envelope labels? Just purchase a packet of self-adhesive labels - in the store or online, put them in the printer, and let Mail Merge print the names and addresses of all your recipients directly onto the labels. It is quick and easy.
Mail Merge isn’t just for labels, however. Following the steps below, I’ll show you how you can also create festive gift labels and place cards. The results will show off your computer savvy, creativity, and holiday spirit.


Before You Begin Mail Merge
You will have to purchase sheets of labels and/or place cards, depending on your project. You can find these at most, if not all, retailers that sell office supplies. You are likely to find Avery® brand templates, so for envelope and gift labels, 5160™ Address Labels are a fine choice. For place cards, you can go with 5011™ Place Cards. Keep in mind that other vendors often indicate their products’ compatibility with Avery® products, so if you want to use a different brand, go for it!
How to Use Mail Merge
- Open a blank document in Word
- Launch the Step-by-Step Mail Merge Wizard

If you are a beginner, you will probably want to use the Step-by-Step Mail Merge Wizard, which guides you through each step of the process. In Word, go to Mailings > Start Mail Merge > Step-by-Step Mail Merge Wizard. - Select document type

Step one of Mail Merge requires you to select the type of document you’ll be creating. Select Labels, even if you are creating place cards. - Select starting document and label type

Next, you will select your starting document, i.e., the document into which you will be importing recipient information. Choose Change document layout. By changing the layout, you are telling Word to create a table that conforms to the dimensions of the labels you will select in the next step.
After clicking on the blue Label options link, choose the template you need by selecting the vendor and product number found on the package of your labels. - Select recipients
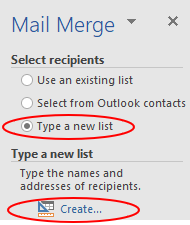

Did I say using Mail Merge wasn’t time-consuming? Well, it is - but only at first. That’s because you have to create your recipient list, which means filling in fields for first name, last name, street, city, state, and zip code. The bright side is, once you’ve entered this information and saved it as a file, you can use it over and over again. You can even add and delete entries, edit information, and exclude recipients from certain mailings at any time. To create this list you have a few options, including directly importing your Outlook contacts, or importing data from an Excel file. The easiest way, in my opinion, is to manually enter the information in Word, during the Mail Merge process.
Select Type a new list, then click on the Create link underneath. Word will then launch the New Address List dialog box, where you will enter recipient information into the fields provided, then save the list as a database file (.mdb) in your computer. Be sure to click New Entry when needed.
A few things to remember: - You do not have to fill in every field, though you should at least fill in the information for First Name, Last Name, Address Line 1, City, State, and ZIP Code.
- Depending on your project, you may only need information from some Mail Merge allows you to pick the needed fields from the list. For example, for place cards, you may only need First Name; other data would not be not required.
- Since the list is saved as its own file, you can reuse it for future mailings and other projects. You can also open the list to edit recipient information and add/delete entries, though you’ll have to start a new Mail Merge project to do this. If using it in the future, you’ll select Use an existing list, rather than Type a new list.
- Arrange your labels

Now, based on the list you selected in the previous step, you need to decide which fields to use and how you want them ordered. Most options, such as Address block and Greeting line have a preset order, which you can review after selecting your option of choice. Otherwise, you can select More items… and choose the fields you want.
Envelope Labels
For envelope labels, choose Address Block. This will open the Insert Address Block dialog box, where you can preview the layout of fields and make any needed changes, though you likely will not have to. Importantly, be sure the preview is of the first record in your list, and if not, click the back button above the preview display until you see a “1” in the box. This will serve as the template for all other labels, so you want to make sure Mail Merge is starting with the first record in the list. After clicking OK, you will see the <<AddressBlock>> placeholder on the document, in the first cell of the table.
Clicking on Update all labels in the Mail Merge pane will apply this layout and other format settings to all other labels, so before you click it, you will want to choose and apply your desired font and font size settings to the first record.
You will also want to decide on the alignment of the text. This setting needs to be applied to the whole table, so first, go to the contextual Layout tab under Table Options, click on Select, then Select Table. Now with the table selected, choose your desired alignment by selecting one of the options in the Alignment group, also in the Layout tab.
With your format settings applied, click on Update all labels.
Gift Labels and Place Cards
Since gift labels and place cards require only names, choose More items…. In the Insert Merge Fields dialog box, select First Name, then click Insert. For place cards, you may want last names as well, so with the dialog box still open, insert Last Name. After your desired fields have been inserted into the first cell of the table, click Close.
If you are using both first and last names, make sure to click into the first cell and put a space between the two fields.
For gift labels, type “To:” and a space before <<First_Name>>. Now, press Enter after <<First_Name>> to create a new line, type “From:” and a space, then type in the name of the gift-giver.
Now is also a good time to choose your desired font and alignment settings, as described in the section above, Envelope Labels.
Lastly, you may want to insert a festive picture or two onto your gift labels and place cards. This can be a bit tricky since Word, by default, locks your picture into the line of text. Therefore, before inserting the picture, go to the first cell and create a new line for your picture. With your insertion point on the new, empty line, go to Insert > Online Picture, then inset your picture of choice. (If any of the pictures you want to use are saved on your computer, then choose Picture.)
After inserting the picture, resize as needed. You may also have to adjust the layout settings for the picture, which you can do by using the Wrap Text tool, found in your contextual Format tab. (Remember: if you don’t see the Format tab, click on the picture to activate it.) By changing the setting from In Line with Text to anything else, you will be able to move the picture to a different location with a simple click-and-drag. In Front of Text may be the best option for this particular project.
Once you have applied your settings for text and pictures, click on Update all labels. - Update all labels and preview your labels
After clicking on Update all labels, each subsequent cell in the table will display <<NextRecord>>. This means you have now applied the settings from the first record onto all other records.
Next, click on Preview your labels. This will merge the data from your recipient list into their respective placeholders on the document. Note that since this is a “preview,” it only shows you the first sheet of records. For example, if printing envelope labels with sheets that hold 30 labels, you will only see the first 30 records of your recipient list. If you need to make any formatting changes, you can go back to the previous step (Arrange your labels), make the needed changes in the first record, then click Update all labels again. Otherwise, go to the next step, Complete the merge. - Complete the merge

In this final step, you can either print all labels and/or place cards, or edit individual records. To print, simply click on Print…, choose All from the Merge to Printer dialog box that appears, then click OK. Due to Word’s default settings, your print dialog box will likely instruct you to manually feed the printer. Just load the needed number of label/place card sheets into the print tray, then press the print button on the printer.
If you need to edit any individual records—for example, you may need to update a newlywed’s last name—click on Edit individual labels. Choose All from the Merge to New Document dialog box that appears, then click OK. This will paste all records onto a new document, where you can scroll through and make any necessary changes. After completing your edits, you can print from the File menu.
There you have it. Peel-and-stick those labels, and fold-and-set those place cards. Your holiday spirit is now on full display!


More on Mail Merge
Want to learn more about using Mail Merge? These Microsoft Office reference books provide detailed, step-by-step instructions and screenshots for using Mail Merge.
Learn Microsoft Office 2019 by Linda Foulkes (eBook)
Microsoft Office Inside Out (Office 2021 and Microsoft 365) by Joseph W. Habraken (print)
Microsoft Office, Step by Step (Office 2021 and Microsoft 365) by Joan Lambert (print)
Microsoft Word for Dummies by Dan Gookin (print)
Microsoft Word 2019, Step by Step by Su T.P. (eBook)
More on Holiday Decorating
For more inspiration and ideas for holiday decorating, check out some of these notable books:
All New Crafts for Kwanzaa by Kathy Ross (print and eBook)
Twenty-two fun projects for kids help them learn about Kwanzaa.
Holiday Hand Lettering: 30 Festive Projects to Celebrate Christmas (print)
"Nothing brings holiday cheer like beautifully hand-lettered cards, gift tags, and decorations. Each of the 30 projects in this illustrated how-to guide offers a design idea that you can use or adapt for your own crafts. Step-by-step instructions provide clear guidance, and there's plenty of space for you to try the design for yourself. A basics section provides the information you need to know to get started, from selecting the best tools to learning the essential terminology. For additional inspiration, there will be a collection of ten alphabets to copy or personalize for your projects.”
Martha Stewart’s Handmade Holiday Crafts: 225 Inspired Projects for Year-Round Celebrations (print)
A treasury of projects, tips, inspiration, and techniques for year-round holiday crafting. Includes Thanksgiving, Hanukkah, and Christmas.
Don’t forget about our online databases! Creativebug.com has thousands of award-winning art & craft video classes taught by recognized design experts and artists. Be sure to check out their Holiday + Party classes. Sign in from anywhere using your MCLS library card barcode and PIN.
- by Keith, Technology Instruction
Comments
Post a Comment